系列文章
Svg Flow Editor 原生svg流程图编辑器(一)
Svg Flow Editor 原生svg流程图编辑器(二)
Svg Flow Editor 原生svg流程图编辑器(三)
实现对齐辅助线
在 logicFlow 中,辅助线的实现是通过遍历节点的位置信息计算得出,源码如下:


在本项目中,节点的位置计算打算放置到 worker 中进行处理:
const worker = new Worker("/src/core/Worker/AuxiliaryLine.worker.ts");

// mousedown 中, 启用 worker 计算位置(放置move频繁计算导致页面卡顿)
public mousedown(e: MouseEvent, graph: IGraph) {
    this.allNode = this.draw.getAllNodeInfo();
}
移动过程中,实时计算当前移动元素的位置,并利用 postMessage 给worker 传参,计算后,如果需要显示辅助线,则通过 onmessage 接收。然后在 worker中进行位置比较,如果达到辅助线的显示要求,则将显示辅助线的参数返回即可。
我们先定义辅助线的几种场景(当然,垂直方向也是类似的哈 ):

从左往右移动过程中,能显示辅助线的场景无非上诉几种,根源上,还是一个矩形,能显示辅助线的几种情况如下:
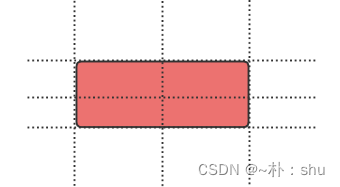
上图中,一个矩形一共有6条线需要参与计算,只需要得到6条线段的位置坐标,与 allData进行位置比较即可。
关键代码如下:
self.onmessage = (event) => {
  const { current, allNode } = event.data;
  const list = allNode as INodeInfo[];
  const { v1, v2, v3, h1, h2, h3 } = computedLine(current);
  const varr = [v1, v2, v3];
  const harr = [h1, h2, h3];
  // 定义返回结果
  var result: { num: number; type: string }[] = [];
  // 循环
  list.forEach((node) => {
    if (node.ID === current.ID) return;
    const nodeLine = computedLine(node);

    if (varr.find((i) => i === nodeLine.v1))
      result.push({ num: nodeLine.v1, type: "v" });

    if (varr.find((i) => i === nodeLine.v2))
      result.push({ num: nodeLine.v2, type: "v" });

    if (varr.find((i) => i === nodeLine.v3))
      result.push({ num: nodeLine.v3, type: "v" });

    if (harr.find((i) => i === nodeLine.h1))
      result.push({ num: nodeLine.h1, type: "h" });

    if (harr.find((i) => i === nodeLine.h2))
      result.push({ num: nodeLine.h2, type: "h" });

    if (harr.find((i) => i === nodeLine.h3))
      result.push({ num: nodeLine.h3, type: "h" });
  });

  // 返回结果,确保每次移动只会返回一次结果,而不是循环返回多次,会导致某些线段无法渲染问题
  postMessage(result);
};
可能需要在辅助线的位置进行吸附,就更加明显了,属于优化哈,后期慢慢处理。
快捷键实现
document.addEventListener("keydown", this.globalKeydown.bind(this));

// 事件具体实现
for (let s = 0; s < eventList.length; s++) {
      const shortCut = eventList[s];

      if (
        (shortCut.mod
          ? isMod(evt) === !!shortCut.mod
          : evt.ctrlKey === !!shortCut.ctrl &&
            evt.metaKey === !!shortCut.meta) &&
        evt.shiftKey === !!shortCut.shift &&
        evt.altKey === !!shortCut.alt &&
        evt.key === shortCut.key
      ) {
        if (!shortCut.disable) {
          // 执行回调
          shortCut?.callback?.();
        }
        break;
      }
    }
快捷键的关键代码就是给document添加 keydown 事件, 通过 for 遍历用户自定义的快捷键列表,比对 event.key 与用户的key 是否一致,进而调用 callback 实现。在此基础上,可以实现上下左右的 graph 移动事件:
  private graphMoveHandle(d: string, payload: cbParams | undefined) {
    const step = 10;
    const minstep = 2;
    // 1. 判断是否有选中的节点
    const selector = 'g[class="svg-flow-node svg-flow-node-selected"]';
    const g = this.rootSVG.querySelector(selector); // 这个是拿到g
    if (!g) return;
    // 2. 通过 g 拿到 实际的元素
    const element = g.querySelector('[type="graph"]') as SVGAElement;
    const nodeID = element.getAttribute("graphID");

    // 3. 通过 graphMap 获取 x y 属性
    const x = Number(element.getAttribute(graphMap[element.tagName][0]));
    const y = Number(element.getAttribute(graphMap[element.tagName][1]));
    const rd = payload?.ctrl ? minstep : step;

    // 3. 执行移动的实际逻辑
    if (d == "0")
      element.setAttribute(graphMap[element.tagName][0], (x - rd).toString()); // 左移
    if (d == "1")
      element.setAttribute(graphMap[element.tagName][1], (y - rd).toString()); // 左移
    if (d == "2")
      element.setAttribute(graphMap[element.tagName][0], (x + rd).toString()); // 左移
    if (d == "3")
      element.setAttribute(graphMap[element.tagName][1], (y + rd).toString()); // 左移

    // 4. 处理 形变、连接锚点位置
    const grapg = new Graph(this, element);
    this.createFormatAnchorPoint(element, grapg);
    this.updateLinkAnchorPoint(nodeID as string, element);
} 
框选选择
通过给根元素添加 mouse 事件实现,框线开始时,需要设置 move、记录初始 sx sy 、显示 select-mask,移动过程中进行框选div的属性设置,移动结束后,记录结束位置。
this.rootDIV.addEventListener("mousedown", this._mouseDown.bind(this));
this.rootDIV.addEventListener("mousemove", this._mouseMove.bind(this));
this.rootDIV.addEventListener("mouseup", this._mouseUp.bind(this));
关键代码如下:
  /**
   * 框选开始 - mouseDown
   *  设置 move、记录初始 sx sy 、显示 select-mask
   * @param e
   */
  private _mouseDown(e: MouseEvent) {
    this.move = true;
    this.rootSVG
      .querySelectorAll("g")
      // @ts-ignore
      .forEach((i) => (i.style["pointer-events"] = "none"));

    const selector = 'div[class="select-mask"]';
    this.maskdom = this.rootDIV.querySelector(selector) as HTMLDivElement;

    // @ts-ignore
    this.maskdom.style["pointer-events"] = "none";
    const { offsetX, offsetY } = e;
    this.sx = offsetX;
    this.sy = offsetY;
    this.maskdom.style.left = offsetX + "px";
    this.maskdom.style.top = offsetY + "px";
    this.maskdom.style.display = "block";
  }

  /**
   * 移动过程绘制框框
   * @param e
   */
  private _mouseMove(e: MouseEvent) {
    if (!this.move) return;
    const { offsetX, offsetY } = e;
    // 这里处理反向框选   x 往左边拖动,则拖动的位置始终是left的坐标,宽度则是计算的处
    if (offsetX - this.sx < 0) this.maskdom.style.left = `${offsetX}px`;

    if (offsetY - this.sy < 0) this.maskdom.style.top = `${offsetY}px`;

    this.maskdom.style.height = `${Math.abs(offsetY - this.sy)}px`;

    this.maskdom.style.width = `${Math.abs(offsetX - this.sx)}px`;
  }

  /**
   * 移动结束 记录结束位置,用于计算框选的宽高位置信息,以确定谁被选中
   * @param e
   */
  private _mouseUp(e: MouseEvent) {
    const selector = 'div[class="select-mask"]';
    const dom = this.rootDIV.querySelector(selector) as HTMLDivElement;
    this.move = false;
    // @ts-ignore 设置 svg 可响应
    this.rootSVG
      .querySelectorAll("g")
      // @ts-ignore
      .forEach((i) => (i.style["pointer-events"] = ""));

    // @ts-ignore
    dom.style["pointer-events"] = "";

    const { offsetX, offsetY } = e;
    // 记录抬起位置
    this.ex = offsetX;
    this.ey = offsetY;

    // 进行选中计算

    // 进行重置参数
    dom.style.display = "none";
    dom.style.left = "0";
    dom.style.top = "0";
    dom.style.width = "0";
    dom.style.height = "0";
  }
结果处理中,需要根据 sx sy ex ey的位置信息,判断哪个元素被选中,添加 selected 样式即可:
  /**
   * 计算选中结果
   * @returns
   */
  private computedResult() {
    return new Promise<string[]>((resolve, reject) => {
      let x = [Math.min(this.sx, this.ex), Math.max(this.sx, this.ex)];
      let y = [Math.min(this.sy, this.ey), Math.max(this.sy, this.ey)];

      // 定义被选中的元素数组
      let selected: string[] = [];
      this.getAllNodeInfo().forEach(({ ID, cx, cy, w, h }) => {
        // 通过 cx cy w h 计算元素的 4 个角的坐标
        const lt = { x: cx - w / 2, y: cy - h / 2 };
        const rt = { x: cx + w / 2, y: cy - h / 2 };
        const lb = { x: cx - w / 2, y: cy + h / 2 };
        const rb = { x: cx + w / 2, y: cy + h / 2 };

        // 判断 4 个角是否处于框选范围内
        const islt = this.computedIsSelected(lt, x, y);
        const isrt = this.computedIsSelected(rt, x, y);
        const islb = this.computedIsSelected(lb, x, y);
        const isrb = this.computedIsSelected(rb, x, y);

        function inside() {
          if (islt || isrt || isrb || islb) selected.push(ID);
        }

        function all() {
          if (islt && isrt && isrb && islb) selected.push(ID);
        }

        this.mode === "inside" ? inside() : all();
      });

      resolve(selected);
    });
  }
插件化
插件化指的是通过 plugin 实现拓展功能,例如元件库、顶部操作区,底部显示等:
![]()
当然,插件化的所有功能实现,均需有对应的API实现,不然用户不加载你的插件,连基础的功能都实现不了,插件化的核心就是脱离页面,可通过API调用实现响应功能。
 定义 footer 模板,添加样式,实现加载:

实现缩放,缩放的核心是 scale 实现:
/**
   * 实现缩放的关键方法 单独出来是为了供 command 实现调用
   * @param scale
   */
  public scalePage(scale: number) {
    const editorBox = this.draw.getEditorBox() as HTMLDivElement;
    // 考虑临界值  实现缩放
    editorBox.style.transform = `scale(${scale})`;
    // 同时还需要考虑 footer 的缩放比例同步显示
    const root = this.draw.getRoot();
    const footerBox = root.querySelector('[class="sf-editor-footer"]');
    if (footerBox) {
      // 修改缩放比例 command=resize
      const resize = footerBox.querySelector(
        '[command="resize"]'
      ) as HTMLSpanElement;
      resize.innerHTML = Math.ceil(scale * 100).toString() + "%";
    }
    // 执行 pageScale 回调
    nextTick(() => {
      const eventBus = this.draw.getEventBus();
      const listener = this.draw.getListener();
      const graphLoadedSubscribe = eventBus.isSubscribe("pageScale");
      graphLoadedSubscribe && eventBus.emit("pageScale", scale);
      listener.pageScale && listener.pageScale(scale);
    });
  }

上图是加载了所有插件的样式,包括顶部操作区,左侧元件库,底部信息展示。
旋转实现
.rotate {
    // background-color: red;
    background: url('/public/rotate.svg') 100% 100% no-repeat;
    position: absolute;
    right: -10px;
    top: -10px;
    height: 16px;
    width: 16px;
    cursor: url('/public/rotate.svg'), auto;
}
通过 cursor url 指定一个svg ,可以实现hover后鼠标样式的修改:

通过鼠标的位置计算出旋转角度:
    // 执行旋转的关键函数
    function rotateHandle(e: MouseEvent) {
      // 需要通过计算得出旋转的角度
      const centerX = x + width / 2;
      const centerY = y + height / 2;
      const mouseX = e.offsetX;
      const mouseY = e.offsetY;
      const deltaX = mouseX - centerX;
      const deltaY = mouseY - centerY;
      let angle = (Math.atan2(deltaY, deltaX) * 180) / Math.PI;
      graph.setRotate(angle - 136 + 180); // 加减是为了抵消默认旋转角度的影响
    }
但是目前旋转后,对拖动、缩放都有影响,因为旋转后的位置坐标相对的 e 事件,导致了
offset 位置变化。大家有什么实现思路,可以讨论下。
层级处理
基于 div 的zIndex 实现层级:
 // 置于顶层
  public top() {
    const isSelected = this.draw.getGraphEvent().getSelected();
    if (!isSelected) return;
    const allSelected = this.draw.getGraphEvent().getAllGraphMain();

    var zIndexArr: number[] = [];
    allSelected.forEach((div) => zIndexArr.push(~~div.style.zIndex));
    const max = Math.max.apply(Math, zIndexArr);
    const index = ~~isSelected.style.zIndex;
    // 如果自己大于等于最小值,则再减1
    if (index <= max)
      isSelected.style.zIndex =
        index === 1 ? index.toString() : (index + 2).toString();
  }

  // 置于底层
  public bottom() {
    const isSelected = this.draw.getGraphEvent().getSelected();
    if (!isSelected) return;
    const allSelected = this.draw.getGraphEvent().getAllGraphMain();
    var zIndexArr: number[] = [];
    allSelected.forEach((div) => zIndexArr.push(~~div.style.zIndex));
    // 找到数组中最小的
    const min = Math.min.apply(Math, zIndexArr);
    const index = ~~isSelected.style.zIndex;
    // 如果自己大于等于最小值,则再减1
    if (index >= min)
      isSelected.style.zIndex =
        index === 1 ? index.toString() : (index - 2).toString();
  }

  // 上移一层
  public holdup() {
    const isSelected = this.draw.getGraphEvent().getSelected();
    if (!isSelected) return;
    // 获取当前的层级 进行++
    const index = ~~isSelected.style.zIndex;
    isSelected.style.zIndex = (index + 1).toString();
  }

  // 下移一层
  public putdown() {
    const isSelected = this.draw.getGraphEvent().getSelected();
    if (!isSelected) return;
    // 获取当前的层级 进行--
    const index = ~~isSelected.style.zIndex;
    // 不能是 -1 不然就选不到了
    isSelected.style.zIndex =
      index === 1 ? index.toString() : (index - 1).toString();
  }
空格平移
通过监听 keydown 识别space,监听 mousedown、mousemove、mouseup的事件,利用transform属性实现平移,关键代码如下:
  /**
   * 空格左键单击记录初始位置
   */
  private spaceDown(e: MouseEvent) {
    if (e.buttons === 2) return;
    this.move = true;
    this.sx = e.offsetX;
    this.sy = e.offsetY;
    // 解析当前 transform
    const editorBox = this.draw.getEditorBox();
    const transform = editorBox.style.transform.split(" "); // ['scale(1)', 'translate(0px,', '0px)']

    // 解析当前的偏移量
    this.tx = Number(transform[1].replace(/translate\(|px|,/g, ""));
    this.ty = Number(transform[2].replace(/\)|px/g, ""));
  }

  /**
   * 空格移动位置
   */
  private spaceMove(e: MouseEvent) {
    if (!this.move) return;
    const { offsetX, offsetY } = e;
    const dx = offsetX - this.sx;
    const dy = offsetY - this.sy;

    // 解析当前 transform
    const editorBox = this.draw.getEditorBox();
    const transform = editorBox.style.transform.split(" "); // ['scale(1)', 'translate(0px,', '0px)']

    // 计算最终结果
    const result = `translate(${this.tx + dx}px, ${this.ty + dy}px)`;
    editorBox.style.transform = transform[0] + result;
  }
总结
本篇历时较久,原因是对项目进行了重构,不再使用单一 svg 实现整个元件的实现,而是使用div+svg的结构实现,使得旋转、层级处理上更加简单;目前旋转后,会导致一些位置异常问题,还有待深究,大家有好的想法,欢迎留言讨论呀,同时发布npm后,worker路径也会有问题,个人能力有限,如果大家有好的解决办法,可以分享下。下一篇的重点是实现折线的绘制,以及command API的完善。
![数据结构02:线性表 链表习题01[C++]](https://img-blog.csdnimg.cn/direct/2ef89a97207a486fb993e790c65dafbb.png)