需求
根据树的数据结构画出流程图展示,支持新增前一级、后一级、同级以及删除功能(便于标记节点,把节点数据当作label展示出来了,实际业务中跟据情况处理)
文件结构
初始数据
[
  {
    "ticketTemplateCode": "TC20230404000001",
    "priority": 1,
    "next": [
      {
        "ticketTemplateCode": "TC20230705000001",
        "priority": 2,
        "next": [
          {
            "ticketTemplateCode": "TC20230707000001",
            "priority": 3
          },
          {
            "ticketTemplateCode": "TC20230404000002",
            "priority": 3
          }
        ]
      }
    ]
  }
]
功能实现
index.tsx
import React, { memo, useState } from 'react'
import uniqueId from 'lodash/uniqueId'
import NodeGroup from './group'
import { handleNodeOperation, NodeItemProps, NodeOperationTypes } from './utils'
import styles from './index.less'

export interface IProps {
  value?: any;
  onChange?: any;
}

/**
 * 树形流程图
 */
export default memo<IProps>(props => {
  const { value = [], onChange } = props
  const [activeKey, setActiveKey] = useState('TC20230404000001_1')

  const handleNode = (type = 'front' as NodeOperationTypes, item: NodeItemProps, index: number) => {
    switch (type) {
      case 'click' : {
        setActiveKey(`${item.ticketTemplateCode}_${item.priority}`)
      }; break
      case 'front':
      case 'next':
      case 'same':
      case 'del' : {
        const newList = handleNodeOperation(type, value, `${uniqueId()}`, item, index)
        // 添加前置工单时需要处理选中项
        if (type === 'front') {
          setActiveKey(`${item.ticketTemplateCode}_${item.priority + 1}`)
        }
        onChange?.(newList)
      }; break
    }
  }

  const renderNodes = (list = [] as NodeItemProps[]) => {
    return list.map((item, index) => {
      const key = `${item.ticketTemplateCode}_${item.priority}_${index}`
      const nodeGroupProps = {
        active: `${item.ticketTemplateCode}_${item.priority}` === activeKey,
        options: [],
        handleNode,
        front: item.priority !== 1,
        next: item.next && item.next.length > 0,
        item,
        index,
        sameLevelCount: list.length,
      }
      if (item.next && item.next.length > 0) {
        return (
          <NodeGroup
            key={key}
            {...nodeGroupProps}
            next
          >
            {renderNodes(item.next)}
          </NodeGroup>
        )
      }
      return <NodeGroup key={key} {...nodeGroupProps} />
    })
  }

  return (
    <div style={{ overflowX: 'auto' }}>
      <div className={styles.settingStyle}>{renderNodes(value)}</div>
    </div>
  )
})
group.tsx
import React, { memo, useEffect, useState } from 'react'
import NodeItem from './item'
import styles from './index.less'
import { NodeItemProps } from './utils'

export interface IProps {
  index?: number;
  active?: boolean;
  handleNode?: any;
  sameLevelCount?: number; // 同级工单数量
  front?: boolean; // 是否有前置工单
  next?: boolean; // 是否有后置工单
  children?: any;
  item?: NodeItemProps;
}

/**
 * 流程图-同层级组
 */
export default memo<IProps>(props => {
  const { active, front = false, next = false, handleNode, children, item, index, sameLevelCount = 1 } = props
  const [groupHeight, setGroupHeight] = useState(0)

  useEffect(() => {
    const groupDom = document.getElementById(`group_${item?.ticketTemplateCode}`)
    setGroupHeight(groupDom?.clientHeight || 0)
  }, [children])

  // 处理连接线展示
  const handleConcatLine = () => {
    const line = (showLine = true) => <div className={styles.arrowVerticalLineStyle} style={{ height: groupHeight / 2, backgroundColor: showLine ? 'rgba(0, 0, 0, 0.25)' : 'white' }} />
    return (
      <span>{line(index !== 0)}{line(index + 1 !== sameLevelCount)}</span>
    )
  }

  return (
    <div className={styles.groupDivStyle} id={`group_${item?.ticketTemplateCode}`}>
      {sameLevelCount < 2 ? null : handleConcatLine()}
      <NodeItem
        active={active}
        options={[]}
        handleNode={handleNode}
        front={front}
        next={next}
        item={item}
        sameLevelCount={sameLevelCount}
        index={index}
      />
      {children?.length ? <div>{children}</div> : null}
    </div>
  )
})
item.tsx
/* eslint-disable curly */
import { Select, Space, Tooltip } from 'antd'
import React, { memo } from 'react'
import styles from './index.less'
import { PlusCircleOutlined, CaretRightOutlined, DeleteOutlined } from '@ant-design/icons'
import { ProjectColor } from 'styles/projectStyle'
import { nodeOperationTip, NodeItemProps } from './utils'

export interface IProps {
  index?: number;
  active?: boolean; // 选中激活
  options: any[]; // 单项选项数据 放在select中
  handleNode?: any;
  sameLevelCount?: number; // 同级工单数量
  front?: boolean; // 是否有前置工单
  next?: boolean; // 是否有后置工单
  same?: boolean; // 是否有同级工单
  item?: NodeItemProps;
}

/**
 * 流程图-单项
 */
export default memo<IProps>(props => {
  const {
    index,
    active,
    options = [],
    handleNode,
    front = false,
    next = false,
    item,
  } = props

  // 添加 or 删除工单图标
  const OperationIcon = ({ type }) => {
    if (!active) return null
    const dom = () => {
      if (type === 'del') return <DeleteOutlined style={{ marginBottom: 9 }} onClick={() => handleNode(type, item, index)} />
      if (type === 'same')
        return <PlusCircleOutlined style={{ color: ProjectColor.colorPrimary, marginTop: 9 }} onClick={() => handleNode(type, item, index)} />
      const style = () => {
        if (type === 'front') return { left: -25, top: 'calc(50% - 7px)' }
        if (type === 'next') return { right: -25, top: 'calc(50% - 7px)' }
      }
      return (
        <PlusCircleOutlined
          className={styles.itemAddIconStyle}
          style={{ ...style(), color: ProjectColor.colorPrimary }}
          onClick={() => handleNode(type, item, index)}
        />
      )
    }
    return <Tooltip title={nodeOperationTip[type]}>{dom()}</Tooltip>
  }

  // 箭头
  const ArrowLine = ({ width = 50, show = false, arrow = true }) =>
    show ? (
      <div className={styles.arrowDivStyle} style={front && arrow ? { marginRight: -4 } : {}}>
        <div className={styles.arrowLineStyle} style={{ width, marginRight: front && arrow ? -4 : 0 }} />
        {!arrow ? null : (
          <CaretRightOutlined style={{ color: 'rgba(0, 0, 0, 0.25)' }} />
        )}
      </div>
    ) : null

  return (
    <div className={styles.itemStyle}>
      <Space direction="vertical" align="center">
        <div className={styles.itemMainStyle}>
          <ArrowLine show={front} />
          <div className={styles.itemSelectDivStyle}>
            <OperationIcon type="del" />
            // 可以不需要展示 写的时候便于处理节点操作
            {item?.ticketTemplateCode}
            <Select
              defaultValue="lucy"
              bordered={false}
              style={{
                minWidth: 120,
                border: `1px solid ${active ? ProjectColor.colorPrimary : '#D9D9D9'}`,
                borderRadius: 4,
              }}
              onClick={() => handleNode('click', item, index)}
              // onChange={handleChange}
              options={[ // 应该为props中的options
                { value: 'jack', label: 'Jack' },
                { value: 'lucy', label: 'Lucy' },
                { value: 'Yiminghe', label: 'yiminghe' },
                { value: 'disabled', label: 'Disabled', disabled: true },
              ]}
            />
            <OperationIcon type="same" />
            <OperationIcon type="front" />
            <OperationIcon type="next" />
          </div>
          <ArrowLine show={next} arrow={false} />
        </div>
      </Space>
    </div>
  )
})
utils.ts
/* eslint-disable curly */
export interface NodeItemProps {
  ticketTemplateCode: string;
  priority: number;
  next?: NodeItemProps[];
}

export type NodeOperationTypes = 'front' | 'next' | 'del' | 'same' | 'click'

/**
 * 添加前置/后置/同级/删除工单
 * @param type 操作类型
 * @param list 工单树
 * @param addCode 被添加的工单节点模版Code
 * @param item 操作节点
 */
export const handleNodeOperation = (type: NodeOperationTypes, list = [] as NodeItemProps[], addCode: NodeItemProps['ticketTemplateCode'], item: NodeItemProps, index: number) => {
  if (item.priority === 1 && type === 'front') return handleNodePriority([{ ticketTemplateCode: addCode, priority: item.priority, next: list }])
  if (item.priority === 1 && type === 'same') {
    return [
      ...(list || []).slice(0, index + 1),
      { ticketTemplateCode: addCode, priority: item.priority },
      ...(list || []).slice(index + 1, list?.length),
    ]
  }
  let flag = false
  const findNode = (child = [] as NodeItemProps[]) => {
    return child.map(k => {
      if (flag) return k
      if (type === 'front' && k.priority + 1 === item.priority && k.next && k.next?.findIndex(m => m.ticketTemplateCode === item.ticketTemplateCode) > -1) {
        flag = true
        return { ...k, next: [{ ticketTemplateCode: addCode, priority: item.priority, next: k.next }]}
      }
      if (type === 'next' && k.ticketTemplateCode === item.ticketTemplateCode) {
        flag = true
        return { ...k, next: [...(k.next || []), { ticketTemplateCode: addCode, priority: item.priority }]}
      }
      if (type === 'same' && k.priority + 1 === item.priority && k.next && k.next?.findIndex(m => m.ticketTemplateCode === item.ticketTemplateCode) > -1) {
        flag = true
        return { ...k, next: [
          ...(k.next || []).slice(0, index + 1),
          { ticketTemplateCode: addCode, priority: item.priority },
          ...(k.next || []).slice(index + 1, k.next?.length),
        ]}
      }
      if (type === 'del' && k.priority + 1 === item.priority && k.next && k.next?.findIndex(m => m.ticketTemplateCode === item.ticketTemplateCode) > -1) {
        flag = true
        console.log(index, (k.next || []).slice(0, index), (k.next || []).slice(index + 1, k.next?.length), 223)
        return { ...k, next: [
          ...(k.next || []).slice(0, index),
          ...(k.next || []).slice(index + 1, k.next?.length),
        ]}
      }
      if (k.next && k.next.length > 0) {
        return { ...k, next: findNode(k.next) }
      }
      return k
    })
  }
  return handleNodePriority(findNode(list))
}

// 处理层级关系
export const handleNodePriority = (list = [] as NodeItemProps[], priority = 1) => { // priority 层级
  return list.map((k: NodeItemProps) => ({ ...k, priority, next: handleNodePriority(k.next, priority + 1) }))
}

// 得到最大层级 即工单树的深度
export const getDepth = (list = [] as NodeItemProps[], priority = 1) => {
  const depth = list.map(i => {
    if (i.next && i.next.length > 0) {
      return getDepth(i.next, priority + 1)
    }
    return priority
  })
  return list.length > 0 ? Math.max(...depth) : 0
}

export const nodeOperationTip = {
  front: '增加前置工单',
  next: '增加后置工单',
  same: '增加同级工单',
  del: '删除工单',
}
index.less
.settingStyle {
  margin-left: 50px;
}

.groupDivStyle {
  display: flex;
  flex-direction: row;
  align-items: center;
}

.itemStyle {
  display: flex;
  flex-direction: row;
  align-items: center;
  height: 94px;
}

.itemMainStyle {
  display: flex;
  flex-direction: row;
  align-items: center;
}

.arrowLineStyle {
  height: 1px;
  background-color: rgba(0, 0, 0, 0.25);
  margin-right: -4px;
}

.arrowDivStyle {
  display: flex;
  flex-direction: row;
  align-items: center;
}

.itemAddIconStyle {
  position: absolute;
}

.itemSelectDivStyle {
  display: flex;
  flex-direction: column;
  align-items: center;
  position: relative;
}

.arrowVerticalLineStyle {
  width: 1px;
  background-color: rgba(0, 0, 0, 0.25);
}
叭叭
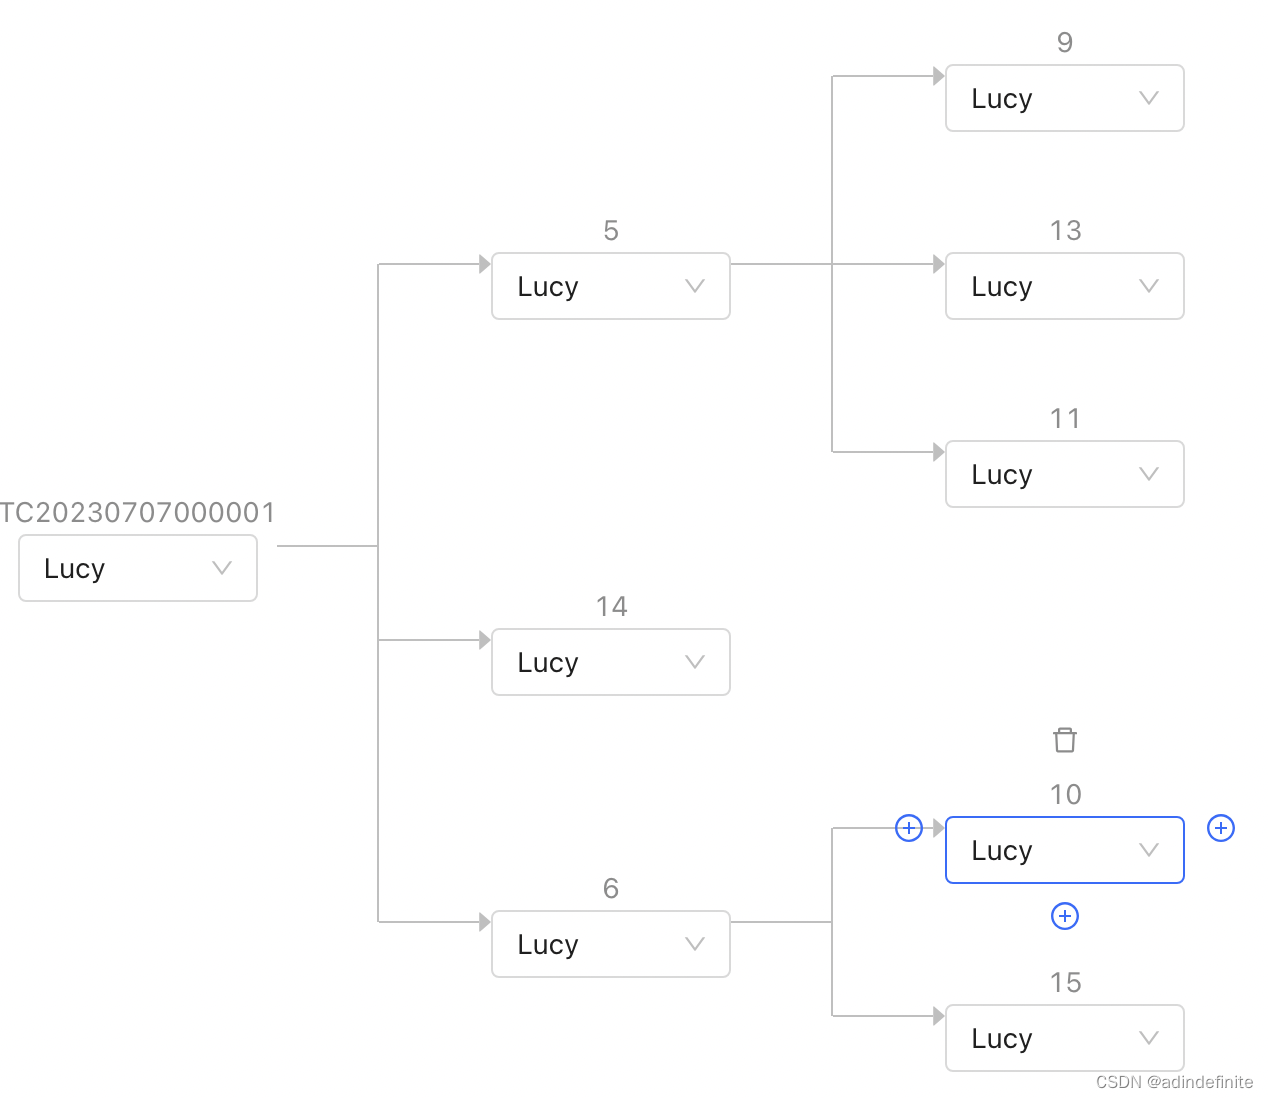
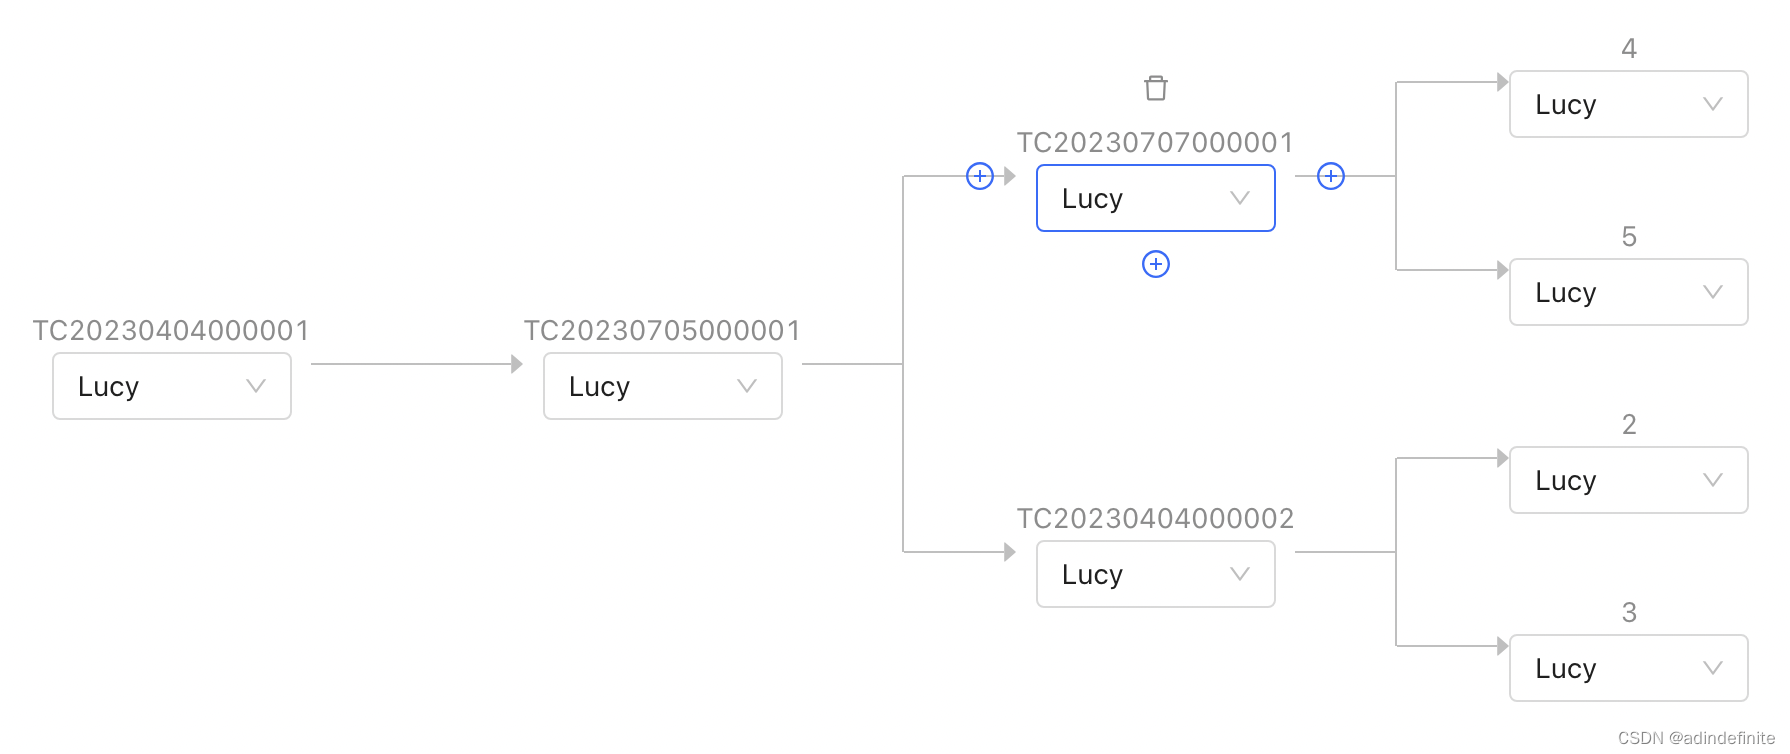
难点一个主要在前期数据结构的梳理以及具体实现上,用递归将每个节点以及子节点的数据作为一个Group组,如下图。节点组 包括 当前节点+子节点,同层级为不同组
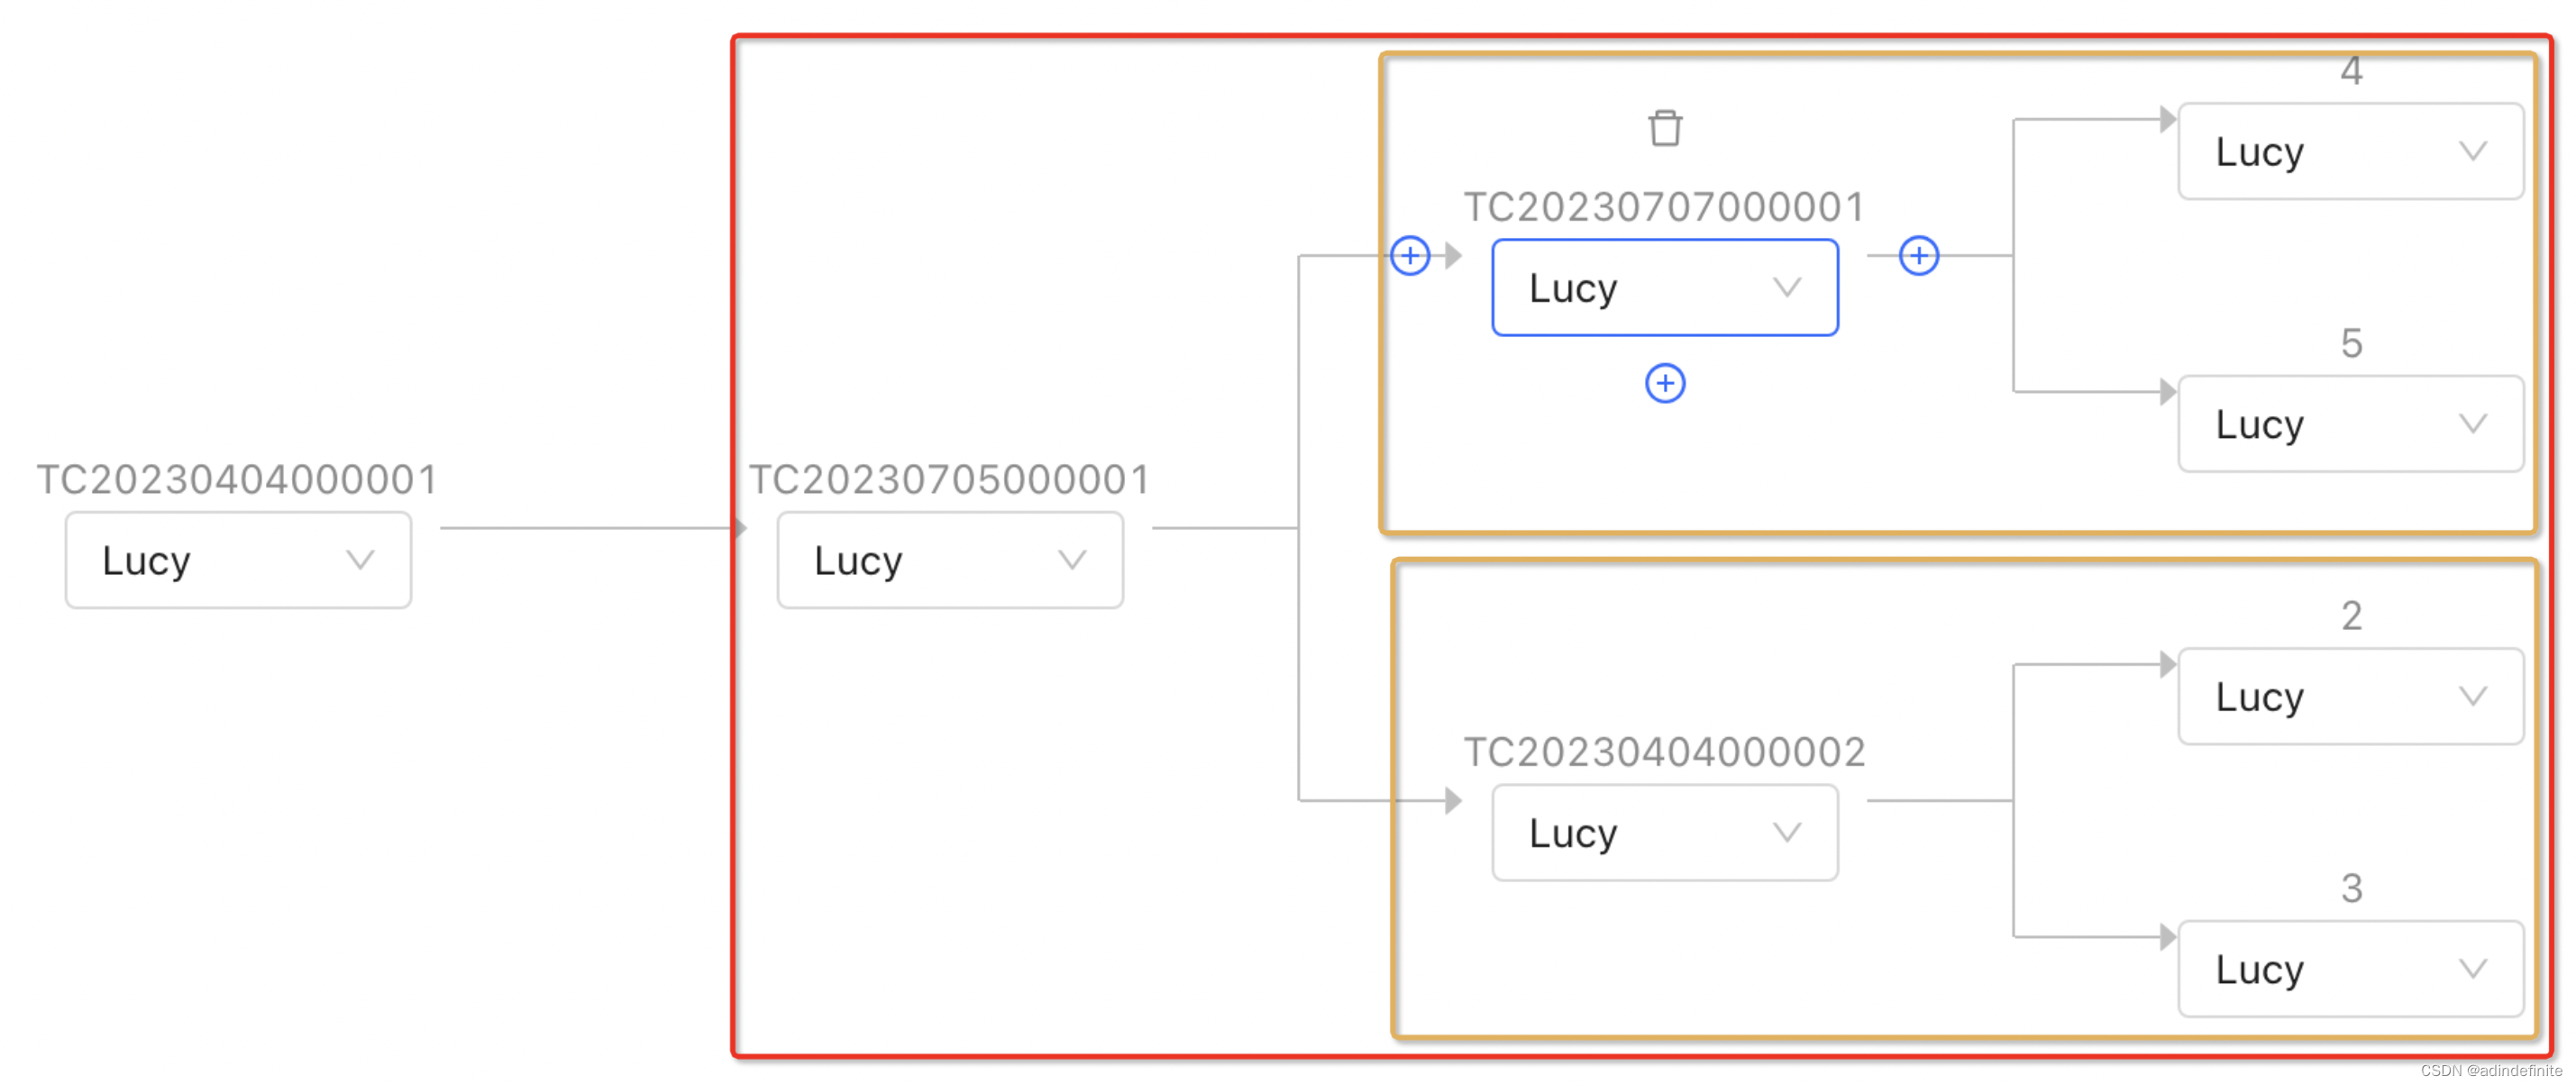
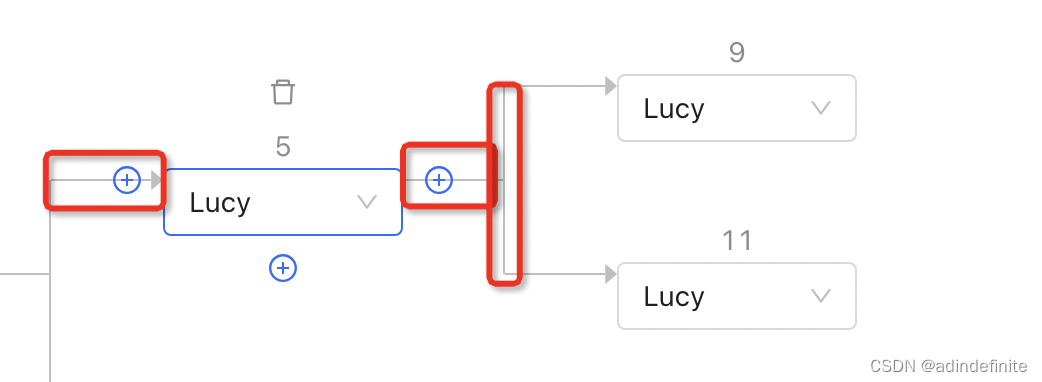
第二个比较麻烦的是由于纯写流程图,叶子节点间的箭头指向连接线需要处理。可以将一个节点拆分为 前一个节点的尾巴+当前节点含有箭头的连接线+平级其他节点含有箭头(若存在同级节点不含箭头)的连接线+竖向连接线(若存在同级节点),计算逻辑大概为94 * (下一级节点数量 - 1)
后来发现在实际添加节点的过程中,若叶子节点过多,会出现竖向连接线缺失(不够长)的情况,因为长度计算依赖下一级节点数量,无法通过后面的子节点的子节点等等数量做计算算出长度(也通过这种方式实现过,计算当前节点的最多层子节点数量……很奇怪的方式)
反思了一下,竖向连接线应该根据当前节点的Group组高度计算得出,连接线分组也应该重新调整,竖向连接线从单个节点的末端调整到group的开头,第一个节点只保留下半部分(为了占位,上半部分背景色调整为白色),最后一个节点只保留上半部分,中间的节点保留整个高度的连接线
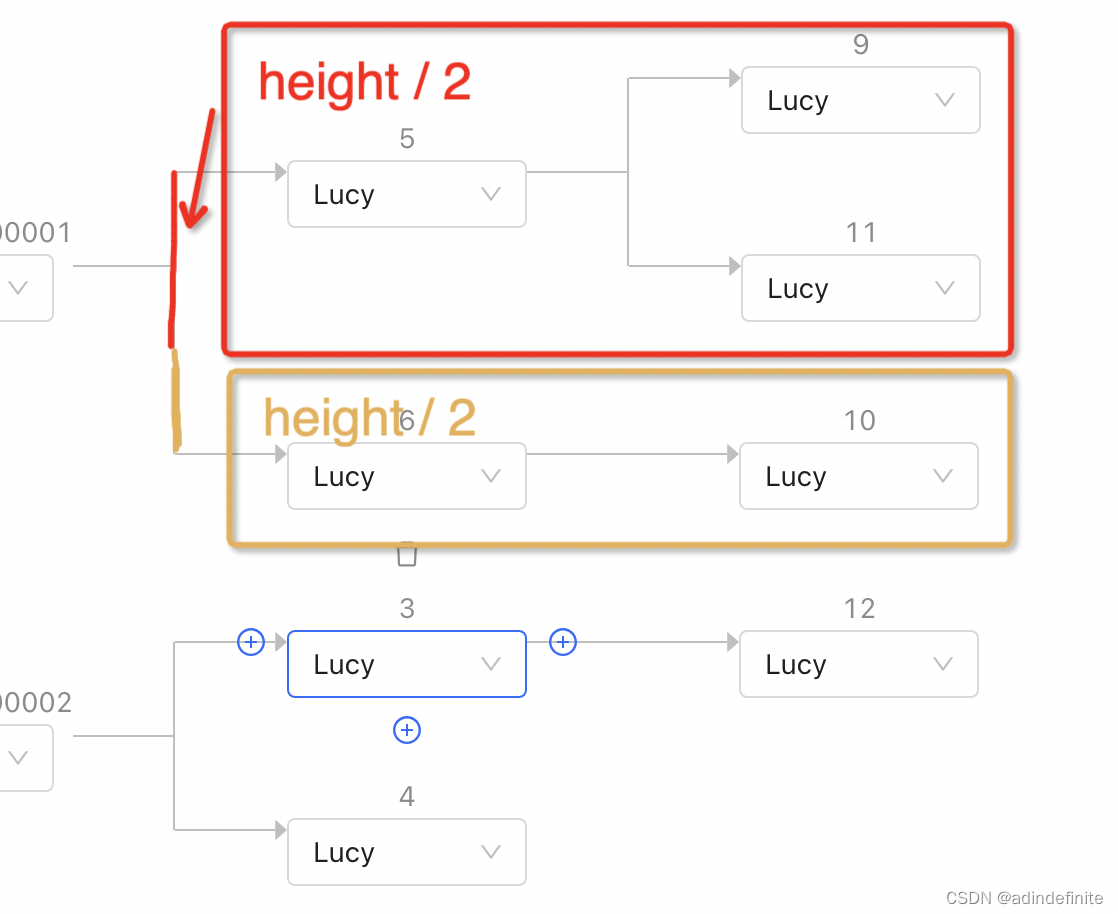
最后展示上的结构是
tree :group根据树形数据结构递归展示
group :竖向连接线(多个同级节点)+ 节点本身Item + 当前节点子节点们
item:带箭头连接线+节点本身+不带箭头的下一级连接线
最终效果