- 安装jsPlumb库:在Vue项目中使用npm或yarn安装jsPlumb库。
npm install jsplumb
- 创建一个Vue组件:创建一个Vue组件来容纳jsPlumb的功能和呈现。
javascript"><template>
  <div style="margin: 20px">
    <div style="margin: 20px">
      <el-button type="primary" size="mini" @click="clearCanvas()"
        >清除连线</el-button
      >
      <el-button type="primary" size="mini" @click="startCanvas()"
        >绘制</el-button
      >
    </div>
    <div class="liucFlex" id="flowContainer">
      <div class="left">
        <div
          @click="clickTitle(item)"
          class="boxLiu"
          v-for="(item, index) in aItem"
          :key="index"
        >
          <div class="word" :class="{ isClick: activeName == item.id }">
            <div><i class="el-icon-view iconRight"></i>{{ item.name }}</div>
            <div class="date">{{ item.date }}</div>
          </div>
          <div class="status" :class="item.status" :id="item.id"></div>
        </div>
      </div>
      <div class="right">
        <div
          class="boxLiu"
          @click="clickTitle(item)"
          v-for="(item, index) in bItem"
          :key="index"
        >
          <div class="status" :class="item.status" :id="item.id"></div>
          <div class="word" :class="{ isClick: activeName == item.id }">
            <div>{{ item.name }}<i class="el-icon-view iconRight"></i></div>
            <div class="date">{{ item.date }}</div>
          </div>
        </div>
      </div>
    </div>
  </div>
</template>

<script>
import { jsPlumb } from "jsplumb";

export default {
  name: "table4",
  props: {},
  components: {},
  data() {
    return {
      // status: 表示连接线状态;error:红色,success:绿色,info:灰色
      aItem: [
        {
          name: "a节点1",
          date: "2023-01-01 20:46",
          id: "1",
          status: "error",
        },
        {
          name: "a节点2",
          date: "2023-01-01 20:46",
          id: "2",
          status: "success",
        },
        {
          name: "a节点3",
          date: "2023-01-01 20:46",
          id: "3",
          status: "success",
        },
        {
          name: "a节点4",
          date: "2023-01-01 20:46",
          id: "4",
          status: "success",
        },
        {
          name: "a节点5",
          id: "5",
          status: "info",
        },
        {
          name: "a节点6",
          id: "6",
        },
        {
          name: "a节点7",
          date: "2023-01-01 20:46",
          id: "7",
          status: "success",
        },
      ],
      bItem: [
        {
          name: "b节点1",
          date: "2023-01-01 20:46",
          id: "11",
          status: "error",
        },
        {
          name: "b节点2",
          date: "2023-01-01 20:46",
          id: "12",
          status: "error",
        },
        {
          name: "b节点3",
          id: "13",
        },
        {
          name: "b节点4",
          date: "2023-01-01 20:46",
          id: "14",
          status: "success",
        },
        {
          name: "b节点5",
          date: "2023-01-01 20:46",
          id: "15",
          status: "success",
        },
        {
          name: "b节点6",
          id: "16",
        },
        {
          name: "b节点7",
          id: "17",
        },
      ],
      plumbIns: null, // 折线初始化的对象
      activeName: null, // 当前选中高亮的id
      // 步骤图的默认配置
      defaultConfig: {
        // 对应上述基本概念
        anchor: ["TopCenter",[0.5, 1, 0, 0]],
        connector: ["Flowchart", { cornerRadius: 0, width: 1, curviness: 50 }],
        endpoint: "Blank",
        // 添加样式
        paintStyle: { stroke: "#E0E3EA", strokeWidth: 1, curviness: 100 }, // connector
        // 添加 overlay,如箭头
        overlays: [["Arrow", { width: 5, length: 5, location: 1 }]], // overlay
      },
    };
  },
  computed: {},
  watch: {},
  created() {},
  mounted() {
    this.setPlumbIns();
  },
  activated() {
    // this.setPlumbIns();
  },
  // 路由切换的时候一定要重置setPlumbIns,防止保留上次绘制的线
  deactivated() {
    this.clearCanvas();
  },
  beforeDestroy() {
    this.clearCanvas();
  },
  methods: {
    // 点击清除连线
    clearCanvas() {
      if (this.plumbIns) this.plumbIns?.reset();
    },
    // 绘制连线
    startCanvas() {
      this.setPlumbIns();
    },
    // 点击切换事件
    clickTitle(item) {
      this.activeName = item.id;
    },
    // 初始化连线
    setPlumbIns() {
      if (!this.plumbIns)
        // 一定要指定连接线的绘制容器,该容器为设置的盒子dom的id值,要给这个css盒子设置一个position:relative属性,不然连线的位置不对,会偏移的很严重,如果不设置将以body容器进行绘制
        this.plumbIns = jsPlumb.getInstance({
          Container: "flowContainer",
        });
      let relations = [];
      // 将新数组转换成所需格式
      for (let i = 0; i < this.aItem.length - 1; i++) {
        relations.push([this.aItem[i].id, this.aItem[i + 1].id]);
      }
      // 获取right的数组
      for (let i = 0; i < this.bItem.length - 1; i++) {
        relations.push([this.bItem[i].id, this.bItem[i + 1].id]);
      }
      let aTob = [];
      // left和right节点相接的地方
      aTob.push(["4", "11"]);
      aTob.push(["15", "7"]);
      this.plumbIns.ready(() => {
        // 默认连线
        for (let item of relations) {
          this.plumbIns.connect(
            {
              source: item[0],
              target: item[1],
            },
            this.defaultConfig
          );
        }
        // a和b相交的连线
        let aTobConfig = JSON.parse(JSON.stringify(this.defaultConfig));
        // 设置a与b节点连接线的方式
        aTobConfig.anchor = ["Left", "Right"];
        for (let item of aTob) {
          this.plumbIns.connect(
            {
              source: item[0],
              target: item[1],
            },
            aTobConfig
          );
        }
      });
    },
  },
};
</script>

<style lang="scss" scoped>
.liucFlex {
  display: flex;
  width: 500px;
  color: #101010;
  font-size: 14px;
  position: relative;
  .word {
    width: 110px;
    height: 50px;
    cursor: pointer;
  }
  .isClick {
    color: #409eff !important;
  }
  .right,
  .left {
    flex: 1;
    margin: 0 10px;
  }
  .right {
    .iconRight {
      margin-left: 5px;
    }
    .status {
      margin-right: 10px;
    }
  }
  .left {
    .iconRight {
      margin-right: 5px;
    }
    .status {
      margin-left: 10px;
    }
    .boxLiu {
      text-align: right;
    }
  }
  .boxLiu {
    display: flex;
    margin-bottom: 20px;
  }
  .status {
    width: 10px;
    height: 10px;
    border-radius: 50%;
    background-color: #e0e3ea;
    vertical-align: top;
    margin-top: 3px;
  }

  .date {
    font-size: 12px;
    margin-top: 10px;
    color: #d0d3d9;
  }
  .error {
    background-color: #f56c6c !important;
  }
  .success {
    background-color: #7ac756 !important;
  }
  .info {
    background-color: #e0e3ea !important;
  }
}
</style>
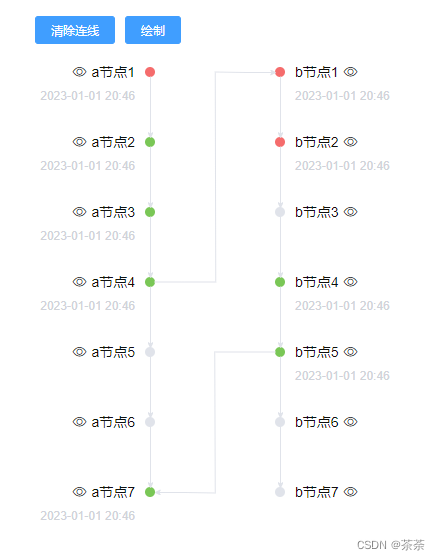
效果图:
- 初始化jsPlumb一定要在mounted函数里面,要执行在dom渲染完成的时候
- 一定要设置绑定的容器,不然连线的容器外加入任何其他布局元素,线会偏移,需要给绑定的容器设置position:relative(原因不详,因为我不设置这个属性线偏移的很严重)
- 路由切换或者多容器需要连线设置,需要重置jsPlumb(this.plumbIns?.reset()),不然线会一直在
| 参数/方法 | 描述 |
Container | 设置连接线的绘制容器,将连接线限制在指定的容器内绘制 |
Draggable | 将元素设置为可拖动,可以被拖动到其他位置 |
Endpoint | 定义连接线端点的样式和行为 |
Connector | 定义连接线的样式和类型 |
Anchors | 定义连接线起始点和目标点的锚点位置 |
PaintStyle | 定义连接线的绘制样式,如颜色、线宽等 |
hoverPaintStyle | 鼠标悬停在连接线上时的绘制样式 |
Endpoints | 定义连接线的起始点和目标点的端点样式 |
MaxConnections | 指定一个元素可以拥有的最大连接数 |
Scope | 用于分组连接线和元素的范围,可以控制连接线的可见性和交互性 |
ConnectionOverlays | 定义连接线上的覆盖物,如箭头、标签等 |
addEndpoint | 动态添加一个连接线的端点 |
connect | 连接两个元素,创建一条连接线 |
repaintEverything | 重新绘制所有连接线和端点,适用于当容器大小改变时需要重新布局时 |
bind | 绑定事件处理程序到连接线或元素上 |
unbind | 取消绑定事件处理程序 |
removeAllEndpoints | 移除所有元素的端点 |
deleteEndpoint | 删除指定元素的一个端点 |
destroy | 销毁jsPlumb实例,清除所有的连接线和端点 |